In this 5th part of an ongoing series, we look at Dynamic Super Resolution (beyond 1080p gaming on a budget), and Vertical Sync settings for NVIDIA graphics cards on Linux. Though it does not matter, the below settings were tested on Manjaro Linux (with NVIDIA proprietary drivers).
5/n: NVIDIA DSR and V-Sync on Linux
Dynamic Super Resolution (DSR)
Dynamic Super Resolution is a great way of implementing anti-aliasing that gives almost same visual fidelity as the more resource intensive Multi-Level (or Multi-Sample) Anti-Aliasing (MLAA/ MSAA), as long as there is enough VRAM on the graphics card. We can have the game rendered higher than the native resolution of the monitor, then downscale the image to native resolution. This is more efficient than MLAA/ MSAA, which renders individual elements at higher resolution in order to optimize VRAM usage, then downscale them to lower resolution and eliminate the jagged edges, but the card has to do more work so MLAA usually causes a big hit on FPS. So if the card has enough VRAM for the higher resolution textures, we can use DSR to achieve AA without compromising much on the FPS (the card still has more work than rendering at 1080p, but way less than MLAA). Another reason it is more efficient is that we don’t have to depend on the game engine’s implementation of AA, which is often not standard across games. Some do it better than others; using DSR removes the bother.
For NVIDIA cards, on Windows we can set them pretty easily through the NVIDIA Control Panel. We need to enable DSR Factors in the panel, then in game the higher resolutions will be unlocked (as the game now thinks monitor supports higher resolutions), and we can just select them as any other resolution. For example, if the monitor is 1080p, we can select DSR factors of 1.33 and 2, to unlock 1440p and 2160p in the game video settings, and so on. The game will then render at that resolution and graphics card will downscale the image to 1080p, thereby providing MLAA for free. Mathematically, the DSR factor is desired vertical resolution / native vertical resolution, so 1.33 = 1440 / 1080, etc.
On Linux, however, DSR factors are not yet implemented in the NVIDIA Settings panel. In order to achieve it, we have to implicitly set a different input viewport resolution. So if we want to use dynamic resolution of 1440p on a 1080p monitor, we have to set Viewport-In to 2560×1440 (assuming monitor has 16:9 aspect ratio). Viewport-out is automatically set to the native resolution, and by default, “Panning” auto-populates with whatever we set in Viewport-In. This also means we cannot have multiple factors at once; we can only use one DSR factor at a time. For example, for 2160p we would have to set the Viewport-In to 3840×2160, which then becomes the desktop resolution.
Desktop resolution
This setting changes the desktop resolution too, until changes are reverted again manually. We are essentially sending 1440p frames to the card to downscale and send 1080p to the monitor (e.g. if the monitor is 1080p). So we will have artificial, software rendered resolution of 1440p down-scaled to 1080p (native) so that the monitor can render everything at 1080p, as that is what it can only do. But the source image is 1440p, so it will be sharper, anti-aliased.
Setting ViewPortIn to a higher resolution than native increases perceptible real estate on the screen. In my opinion, it is actually a good thing and one need not be a gamer to experience it. If you are into programming, you will appreciate it even more.
For example, a 27″ monitor is really too big for 1080p. The ideal resolution for that size is 1440p, and this is really an effective way to get more out of the monitor. The fonts have perfect size and pixel pitch at this resolution. Of course, there will be artifacts if looked too closely, depending on the font being used, but one has to be really close, like say 3-4 inches from screen, but anything beyond 1 ft should not be discernible. Most people are at least 2 ft away from the screen. We might need to tinker a bit with font size, scale factor, and sub-pixel anti-alias settings though, but it wont take too long to arrive at the right combination. Mostly we will have to increase the font size amd/ or increase the scale factor.
Another way to “undo” the change for desktop (but keep it in NVIDIA settings for gaming) is to use display scaling. Most desktop environments like Gnome/ Budgie support it. So if we set DSR (ViewPortIn) to 2160p, then set display scaling to 200%, we get same real estate as 1080p. However, in my experience I have really not seen any deal-breaking alias with DSR, and I am happy with the pixel pitch that comes out of it.
NVIDIA Settings
We can set the values in Linux NVIDIA Settings panel, in the “X-Server Display Configuration” section as shown in Fig. 1. Launch the settings on Linux as root, assuming NVIDIA proprietary drivers are installed, from the terminal using
$ sudo nvidia-settings &
We need to open as root because we would be saving the settings file in
/etc/X11/xorg.conf
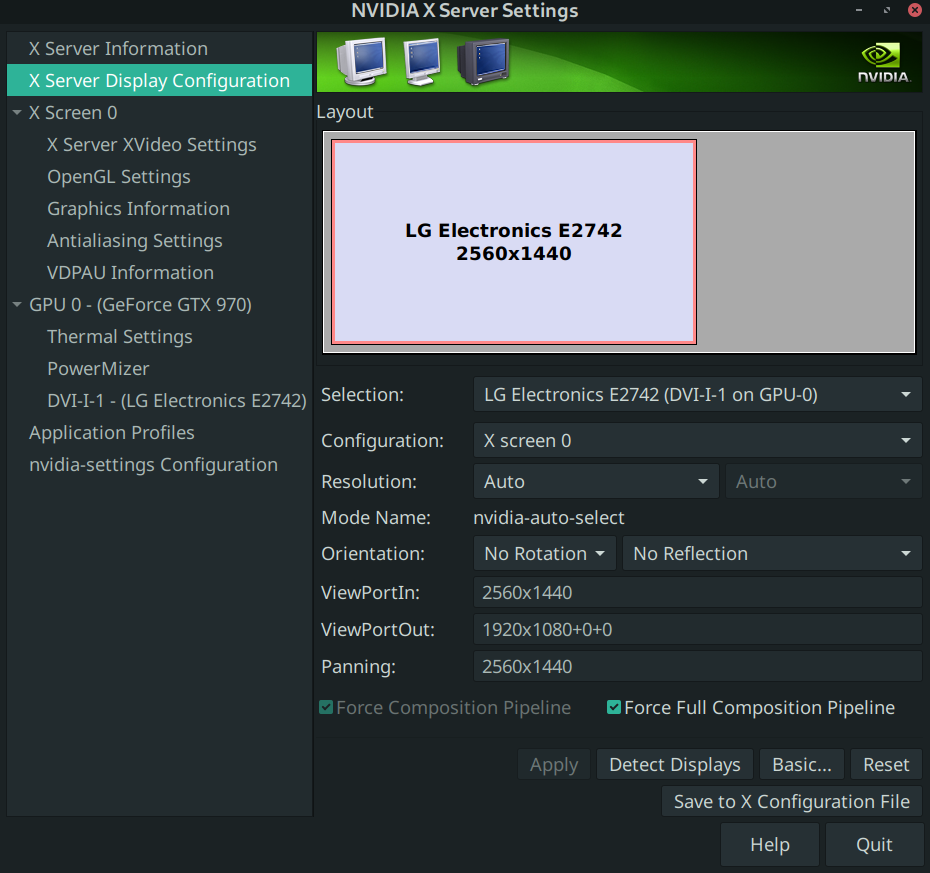
Fig. 1: NVIDIA Viewport and Composition settings in Linux
After setting the required values in ViewPortIn field, and cross-checking the values for ViewPortOut (should be native resolution) and Panning (should be same as ViewPortIn), click on “Save to X Configuration File” button to save the settings. This will open a popup with location pre-populated as somewhere inside /etc/X11/ as shown earlier. Save the file. We can keep “Merge with existing file” option as selected.
For Manjaro, the location can be different as we will read this file through the mhwd utility. Basically, after we save the file, we need to enable it. In most distributions, that would mean adding the below 3 lines to ~/.xinitrc file at the end, save, then re-login (i.e. restart X-Server):
$ vim ~/.xinitrc

# nvidia-settings
nvidia-settings --load-config-only

exec $(get_session)
For Manjaro, however, we need to set the xorg file explicitly in mhwd. So we can save the file on NVIDIA-Settings panel to another location, i.e.
/etc/X11/mhwd.d/nvidia.conf
then configure to read this file in mhwd using
sudo mhwd-gpu --setmod nvidia --setxorg /etc/X11/mhwd.d/nvidia.conf
and reboot.
Frame Limiting and Vertical Sync
Another thing we might want to do is achieve V-Sync through NVIDIA instead of the individual game engine, to prevent screen tearing. This is a phenomenon often seen if the video card is capable of rendering frames more than the native rate, when portions of the frame are rendered quicker, causing the screen to tear at the border of the two portions, breaking immersion. The way to achieve it is by setting a frame limit and/ or enabling V-Sync. Neither of these settings, even if supported by the game, often work the way we want, or at the very least, cause more trouble than it solves problems, like additional stuttering/ lag.
Frame limit is best achieved using a third party monitoring tool like RivaTuner Statistics Server on Windows (a complementary application of MSI Afterburner), or Mangohud in Linux (ref. the previous article in this series). If using Mangohud, we can limit the frame count in Mangohud.conf, one of the possible locations of which is:
$ vim ~/.config/MangoHud/MangoHud.conf
In this file, we can set the var fps_limit to the frame limit we want:
fps_limit=60
Now if we open the game using Mangohud or set a Steam runtime for it (ref. Mangohud readme), the frames will not exceed 60 FPS. This might already be enough to prevent screen tearing in most games, but for a complete solution, we should also enable V-Sync through NVIDIA.
Often the FPS is compromised if we enable V-Sync in game, so it is preferred to have it through NVIDIA settings. Again, this is pretty easy in Windows, where we just set V-Sync to “On” or “Adaptive” depending on whether the card can take it. It is not much difficult to set it on Linux either.
NVIDIA Settings
We can achieve vertical sync using NVIDIA Settings, in the same config section by enabling the “Force Full Composition Pipeline” checkbox as shown in Fig. 1. Doing this will automatically select “Force Composition Pipeline” checkbox also. This will force rendering using the native refresh rate. On my monitor, it is 60 Hz, and it works flawlessly without causing any screen tearing.
Note that if the game is too much work for the card, i.e. it is not able to render at 60 FPS in the first place, then these settings (one or both) will cause stuttering, as the renderer will wait for the frame interval before proceeding.
In some games these settings can actually cause stutters, annoying to the point of making the game unplayable. Should such thing happen, try to first ensure graphics settings apart from resolution are toned down to when the card can render the locked framerate. In some cases, we might have to trade off between AA and smooth framerate, so we can revert back DSR changes. Alternately we can try setting fps_limit to 30 or 45 in Mangohud.conf, or commenting it out altogether. If still does not work, disable the above checkbox in NVIDIA settings. In any case, the issue of screen tearing is when framerate goes above 60; we wont see it otherwise.
Conclusion
It is really easy to achieve DSR and V-Sync in Linux, for an efficient AA and/ or (screen) tear-free experience if the hardware supports it. Most games released up to 2017 should be playable with DSR of 1440p (from native 1080p) on a card having 4+ GB of VRAM. Those that don’t, can be tried with lower textures / other lower graphics settings, and it still might have better fidelity with DSR. VRAM is the limiting factor for rendering high resolution textures. And if the card emits more than 60 FPS, we can also set V-Sync for the perfect PC gaming experience.
As we have seen so far in my series on Linux Gaming, the above settings make the experience even closer to that on Windows. Now only if we could have a 1:1 parity between Windows and Linux control panel settings for NVIDIA. There is no reason for them to be different, most functions are supported on Linux by the hardware, it is just that they may be called differently or may not have a Linux wrapper call, which is not too much effort to write. Then we will be one step closer to achieving parity with Windows. We have come a long way already, so I have hopes…
